
Fixing a Leaking Canvas Tent
One of the biggest advantages of canvas tents is their breathability. When wet, cotton duck canvas fibers expand to block water, then shrink in the sun. Over time, the weave also tightens. However, some holes, rips, and seams might become too big to simply shrink, and that can cause a much larger problem: a leaking tent.
And the last thing you want in the wilderness is a leaking tent.
In this guide, we’ll break down how to identify and fix leaks, whether it’s sealing seams, patching holes, or reproofing your canvas. Plus, we’ll share tips to prevent future leaks so your tent stays waterproof for years to come.
Why Is Your Canvas Tent Leaking?

Before you begin fixing a leaking tent, you need to narrow down where the leak is coming from. A canvas tent can leak for a multitude of reasons like:
A tear or puncture in the canvas
Leaking tent seams need to be resealed
The canvas needs reproofing (after extended use)
Your eaves and guyline tension is not taught enough
The sod cloth is not positioned correctly
It’s not a leak – it’s only condensation!
Water is entering through the tent zippers
Some of the above reasons can be easily corrected. You can tighten those eaves, which will help repel rain. And you can flip that sod cloth back into the tent interior, laying down a tarp floor to keep leaks happening beneath. And you can also learn some tips to prevent condensation.
But for this article, we’ll discuss how to make repairs.
How to Fix a Leaking Canvas Tent
Set up your canvas tent properly, and you will minimize or eliminate leaks. If something is still leaking, inspect the canvas to find how the water is getting in. It could be the seams, or it could even be a tear. Either way, here are some methods to fix a leaking canvas tent.
Repair a Leaking Tent Seam
It’s important to season and reproof a canvas tent to prevent seams from leaking (learn more about those steps below). But even if you have, from time to time, you might discover a leaking seam. This could be a seam along the zippers, along the windows and screens, or even around the stove jack. Either way, it’s important to seal it right away, before it causes more damage.
Here’s how to seam seal a tent:
Set up the tent: If the tent is not already set up, pitch it in the backyard. This will let you see and get to the edges and seams easier.
Clean the area: Clear dirt from the seams. (You don’t want to trap debris under the sealant.) Wipe down the seam with cold water and a mild liquid soap, applying with a non-abrasive sponge or cloth.
Brush the sealant on the seam: Take a small brush (like a paintbrush) and apply a thin layer of silicon-based sealant to the seam. Apply several thin layers, wiping away any excess.
Allow the seams time to cure: Give your canvas seams plenty of time to cure. Simply follow the specific directions for your sealant.
Repair Small Tears and Punctures
If you have a small tear or puncture, you’ll need to patch it up.
To do the trick without a sewing, use Bish’s Tear Mender, a tried-and-true canvas and leather adhesive. Waterproof, quick-drying, and UV-resistant, this tear mender will patch up smaller canvas repairs and rips, fixing leaks on the spot.
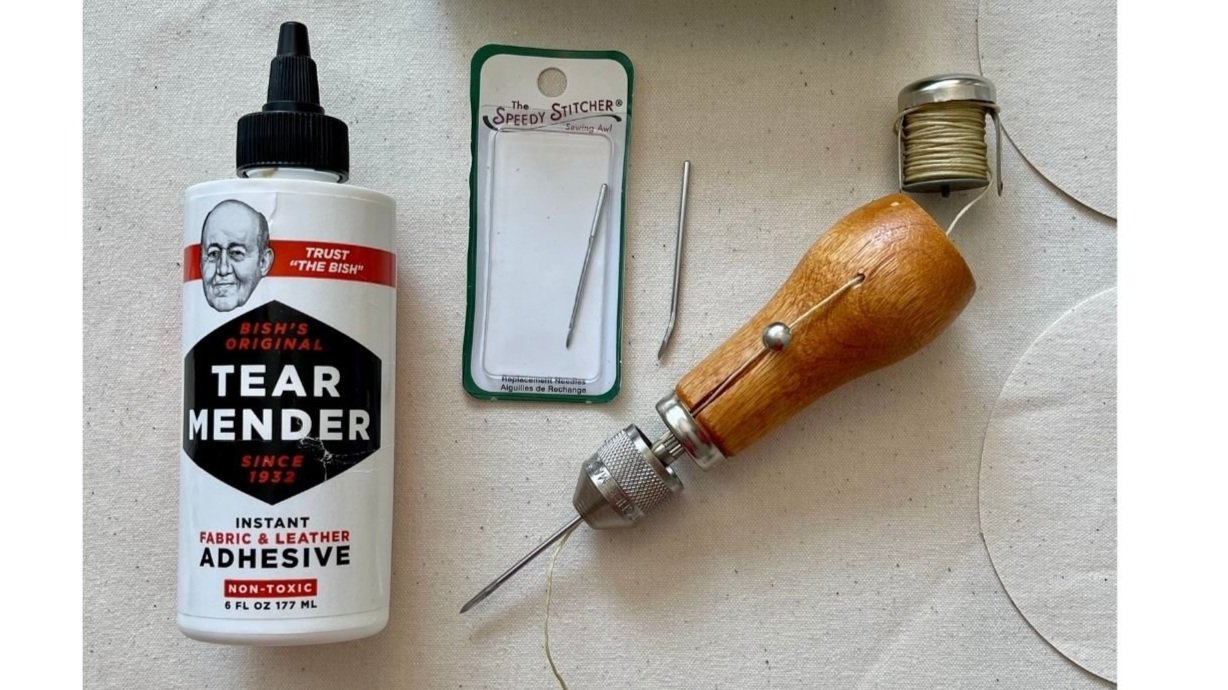
We also recommend using a Speedy Stitcher sewing awl to sew the patches on, along with a heavy-duty upholstery thread made of polyester, nylon, or waxed finish.
Here’s what you’re going to want to do:
Prepare your tear: Wipe the torn edges of the canvas and clean the area with a damp cloth. You need to remove any dirt and debris, keeping your new patch surface clean.
Cut a circular patch: With a spare piece of canvas, cut a round patch roughly 1-2” larger than the tear. This extra width will give it plenty of grip.
Apply the Tear Mender: Shake the bottle and slowly apply a thin amount of glue to the patch, spreading it around the edges.
Patch the exterior canvas: Place the patch over the tear (from the outside of your tent), overlapping the edges. Press the patch down firmly to adhere, then wait for the glue to dry thoroughly. Optional: You could repeat the same patch method inside the tent as an extra precaution.
Stitch the patch: Now, take your Speedy Stitcher and stitch the area. Some folks stitch the outdoor edge; others use a zig-zag method across the entire patch – it’s up to you! Either way, this extra stitch will add extra reinforcement.
Waterproof the patched area: Last but not least, weatherproof! This is especially important for new canvas scraps. Apply a waterproof sealant to the patched area to ensure a leak-proof repair!
Patching Large Holes
Okay, so what do you do about larger holes? You know… the ones that are less a “leak” as they are a gaping hole. If the holes are on the walls, then you can try to first stitch the holes with the Speedy Stitcher as best you can to bring the canvas together. Then glue a larger patch to the outside, followed by one more session of stitching it all again. But you may need to bring this into a shop to have it repaired professionally. Seek out a canvas repair shop, awning shop, or boat cover shop in your area.
When to Reproof Your Tent

After years of use, there's a time when your tent might need reproofing with a waterproof sealant.

Canvas is naturally water-resistant material. Its fibers shrink and expand as needed to prevent leaks during rains and offer breathability. However, to maintain the longevity of your canvas tent, we recommend reproofing every few years (especially for those who leave their canvas tents up year-round). Not not only will retreating your canvas help to make it more water-resistant, but it will also help to keep mildew at bay.
Luckily, reproofing a tent is fairly easy. We recommend using Dry Guy Waterproofing Concentrate, which creates a protective barrier that keeps water out but lets your tent breathe. To apply, we recommend using a pressurized hand sprayer.
We also recommend reproofing your canvas tent on a late summer weekend. The reason for this is because you’ll need time for the sun to completely dry the sealant. And, in the spring or fall, with dampness and rains, this becomes a challenge. And you want your canvas tent to dry and reproof well!
Properly Seasoning and Weathering Your Canvas Tent
It’s entirely possible to haul your brand-spanking new canvas tent straight into the woods without much thought or prep work. But “seasoning” or “weathering” your canvas tent will ensure it can take on those rainy conditions like a champ in the future – and keep you dry!
In fact, it’s one reason some outfitters find their new canvas tents leaking on their first adventure. A canvas tent will leak when it sees its first downpour, no question about it. Why? Because the canvas fibers are fresh and still need to expand. Seasoning the canvas will ensure the seams, stitching holes, and bonds tighten, preventing future leaks.
The decision you must make is whether you want to be inside as the canvas tent experiences a proper seasoning.
But we will always recommend giving your canvas tent a good seasoning/weathering process at home before you head out and rely on it as a more permanent shelter.
Extra Tips and Steps to Prevent Tears and Leaks
Your canvas tent will get leaks. It’s made to last years, decades, and more, but you should expect to provide some maintenance from time to time. And it also helps to take a few steps to prevent those small tears from starting in the first place.
Here are a few tips and steps to keeping your canvas tent leak-free:
Don’t lean items against the walls: Constant contact of an object against your wall could cause water to wick into your tent during rains.
Keep Condensation Out: Cook outside of your tent and store all wet items outside. This will keep moisture from storing up inside of your tent.
Assemble your tent away from large branches: Branches can be quite abrasive to canvas walls and roofs. They can also snap off and fall on the tent, which could puncture a hole in the roof.
Hang a rainfly shelter over the main tent: A rainfly has many advantages, such as trapping air that acts as insulation and preventing condensation inside the tent. But a rainfly can also protect a canvas tent’s roof. And it’s a lot easier to repair or replace a tarp or rainfly than it is a large canvas tent.
Set your canvas tent up correctly: As mentioned earlier, a proper tent setup will prevent leaks and more. Keeping the canvas smooth and taught helps shed water, rain, and snow. Tightening those eave overhangs correctly keeps a dry tent. Not to mention, it prevents corners and other reinforced areas from becoming too strained, which can stretch canvas or create stress on the fibers.
Remove snow loads (and carefully): When using your four-season canvas tent during winter, be mindful of the snow load and weight added to your wall tent structure. For a very heavy snowfall, we recommend removing the snow twice a day to reduce strain on both the canvas and poles. However, when doing so, remove snow carefully. Scraping snow from the roof or away from the walls with the wrong tool can unintentionally tear the canvas. So use something like a soft utility broom.
Thaw the canvas tent: There are instances where a canvas tent can become frozen and packed up too quickly. It is entirely possible to break canvas and damage the threads, if you don’t allow it to thaw a bit first. So keep that in mind when camping in winter.
Keep Your Canvas Tent Leak-Free for Years to Come
A well-maintained canvas tent can last for decades, but it requires proper care to stay waterproof. Whether you’re sealing a leaking seam, patching a tear, or reproofing the entire tent, timely repairs will keep your shelter dry and reliable.
Beyond fixing leaks, preventative measures go a long way. Proper tent setup, tightening eaves, using a rainfly, and keeping the canvas clean will help minimize wear and tear. Seasoning your tent before its first use ensures the fibers expand and contract correctly, while regular reproofing keeps the material water-resistant over time.
No matter where your adventures take you, a little maintenance will ensure your canvas tent remains a dependable home in the wild. Stay proactive, and you’ll enjoy dry and comfortable camping for years to come.